The '61-'71 Dodge Truck Website
| Engines | Rust | Common Problems | Interiors | Drivetrain |

Add a Drain Plug to Your Mopar 8 3/4 Rear
Mopar 8 3/4" Rearend with Brass Drain Plug Added.
How exactly can one properly maintain their Mopar 8 3/4 rearend when there is no drain plug? Well, most owners end up using a suction gun. Or, some take their truck into the lube shop that has an air powered suction canister where the fluid can be removed the easy way. Both of these methods are okay, but neither can fully remove all the fluid in the rear differential. This is because it is difficult to guarantee the placement of the pickup tube inside the differential housing so that it resides at the very bottom of the fluid puddle. The biggest drawback is that both of the above methods are very time consuming since the lubricant is so thick.

There is, however, a somewhat simple and permanent solution to this problem. Add a drain plug to the differential housing so that the lube can be drained. In order to add a plug, you have to do some drilling and tapping plus find the proper plug. Consequently, everything is quite straightforward if you have experience with threading out new holes for previous projects. Either way, this modification is well worth its weight in gold, and doesn't cost very much to perform.

DRAIN PLUG PLACEMENT
Drain Plug Located at Bottom Rear of 8 3/4" Differential Housing
The trick to getting this to work is finding just the right spot where the plug can be installed so that it cannot be broken off while driving, but will be low enough to allow proper drainage. The only logical location is at the back of the differential, just below the spherically shaped geartrain housing. In this location, the drain plug will be easily accessible while remaining out of the way of potentially damaging objects while your vehicle is in motion.

TOOLS AND MATERIALS REQUIRED
Threading Tools Required for This Project
You just need a couple tools for this modification; a 1/8"-27 N.P.T. pipe tap, a 1/8"-27 N.P.T. pipe plug (there are various types but I used the type with the square head), the proper tap drill as noted on the side of the tap (in this case, the author's required a 21/64" drill bit), a tap holding tool of some sort (the one shown above is just one type of tap holder), a drill and a smaller drill bit (such as a 1/8" diameter bit) along with a center punch. The extra drill bit will allow you to pre-drill the hole which will greatly reduce the chance of the large drill bit "walking" on you, or loosing its position while drilling. You may want to use two or three intermediate sizes between the smallest bit and the tap drill; this also decreases the chances of drill bit walking. Oh yeah, plan on purchasing about three quarts of gear lube to re-fill the differential because you will end up draining all the old fluid out during this procedure.

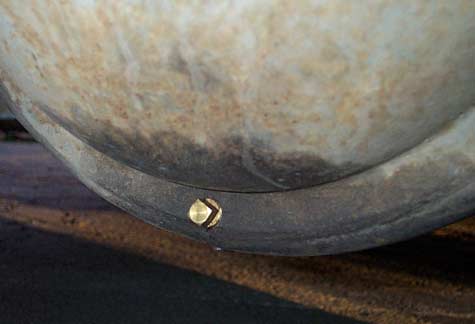
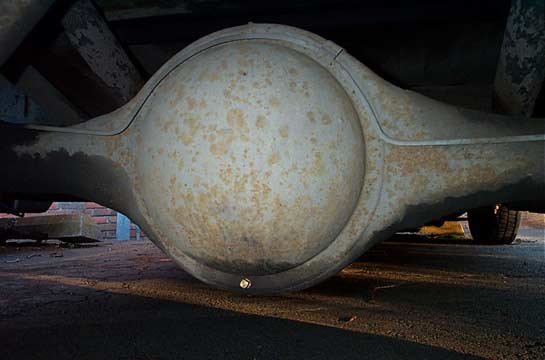
The first step is to place a drain pan underneath the differential to contain the fluid that will drain out once the hole is drilled in the housing. Next, clean off the flat area just below the spherical gear-train housing at the back of the differential. This is the spot where the drain plug will reside (see photos). Center punch a spot at the vertical center of the flat spot on the differential and at the very bottom of the circle; this will maximize the amount of fluid you can drain out of the differential. Once you have a good indentation in the housing that you can easily hit with the small drill bit, drill the pilot hole in the housing using a small drill bit (something like 1/8" diameter). Note: the housing is fairly thick, so be aware that it may take at least a couple minutes to break through to the other side of the housing with the drill bit.

The nice thing about drilling these holes is that the differential lube acts to lubricate the drill bit as you continue drilling.

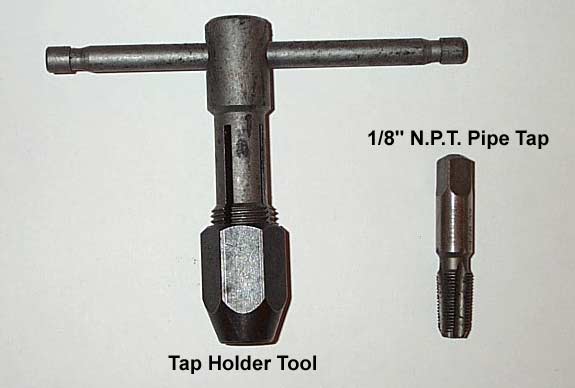
Once you've got a pilot hole drilled, grab the next size drill bit and drill the hole a little bigger. Continue changing out bits and drilling until you get to the size of tap drill your threading tap calls for (as mentioned above, the author's tap called for a 21/64" bit). Drill out your hole to the final tap drill size. Now, insert the tap into the tap holder and carefully tap out the hole. The most crucial thing to pay attention to while tapping is to ensure that the tap is perpendicular from all sides to the differential housing. You must tap the hole straight or the plug will not seat properly!

Tap the hole through to the bottom so that threads have been cut down the entire depth of the hole. As long as you have tapped threads through the entire hole, you can test-fit your plug to determine if further tapping is necessary to cut the threads deeper at the beginning of the hole.

Finally, plug the hole and refill the differential. It takes a little over three quarts of fluid to fully fill the empty differential. Check for leaks and away you go!


| Engines | Rust | Common Problems | Interiors | Drivetrain |

| Main Page | Online Response | Part Sources | Sweptline.org Forums|