Frame Swap using `72-`93 Truck IFS
One of the best options for an IFS swap, the `72-`93 Dodge Truck front frame stub is easily overlooked
when customizers attempt to modify their Sweptline Era trucks. On this page you will find information
from two generous enthusiasts; Randy from Minnesota sent along photos of the fabrication process
(scroll down for his article or click here) while Doug Shepherd sent along a
great deal of tips and drawings for this swap. Both swaps utilize a slightly different philosiphy so
be sure to read through both if you're considering this sort of project.
Doug Shepherd's 1970 D-100
 While most consider car subframes or front clips, Doug Shepherd of
Raymond, Nebraska wouldn't settle for the lesser components and track width that
these car frames had. He looked to Mopar to find the best possible choice in
swap possibilites and after many measurements were taken of various other
vehicles, he chose the `72-up frame to donate the IFS system he wanted to build
into his 1970 Dodge D-100 Shortbox.
Doug was kind enough to provide some hints for this swap and most of the
information on this page is derived from what he has provided. Read on to find
out more about this awesome swap possibility.
While most consider car subframes or front clips, Doug Shepherd of
Raymond, Nebraska wouldn't settle for the lesser components and track width that
these car frames had. He looked to Mopar to find the best possible choice in
swap possibilites and after many measurements were taken of various other
vehicles, he chose the `72-up frame to donate the IFS system he wanted to build
into his 1970 Dodge D-100 Shortbox.
Doug was kind enough to provide some hints for this swap and most of the
information on this page is derived from what he has provided. Read on to find
out more about this awesome swap possibility.
If you are considering this swap, I'd like to hear from you regarding
measurements, photos and specifics. This page is just a general guide for the
swap, but real photos, accurate measurements and sketches of the fabricated
parts needed would be a real bonus for this page. I (site author) am also
considering this swap, and will post all information plus *tons* of real-life
photos of the job if no one else beats me to it.
GENERAL INFO
In order to graft a more modern suspension system onto your `61-`71 Dodge Truck,
you have a variety of choices for the modern unit you wish to install. Since
the aftermarket is apprehensive about building custom parts for Sweptline Era
trucks, we as enthusiasts have "limited" options in this area when compared with
owners of other American trucks. Nonetheless, a swap of this nature is very
possible and can be done with some planning, the right supplies and extra
time.
The swap is actually quite simple; the Sweptline Era truck frame is cut away at
a certain point and bent inward to accept the matching framerail angle of the
later truck frame stub. This stub would come from a comparable `72-`93 Dodge
Pickup. The swap should be viable for a 1/2 ton or 3/4 ton configuration, but
further information is needed before this can be confirmed. The only major
concern with both trucks is matching the suspension components to the usage of
the truck. Either way, the carefully measured, cut and prepared set of frames
are combined to yield a better handling, more advanced setup for your `61-`71
Dodge Truck.
Benefits of this swap include:
- Disc brakes - Discs were original equipment on `72 and later Dodge Trucks
- Power steering - `61-`71 Dodge trucks were available with this option;
however, the setup on a Sweptline Era truck is somewhat rare, difficult to find
parts for and is considered unreliable by some.
- Aftermarket parts availability - The aftermarket has recognized the later
Dodge Trucks as a more popular configuration and thus provides a number of parts
for the coil spring suspension. This includes anti-sway bars, polyurethane
bushings, dropped spindles and other items. Original equipment parts for these
suspensions are also more plentiful.
- Better handling and control - in comparison to the single I-beam front
suspension of any Pre-`71 Dodge Truck, the `72-`93 suspension system is far
easier to control and has better handling than its predecessor.
Drawbacks of this swap include:
- Overall fabrication effort - If you plan on doing a swap like this on your
own, you need the facilities, time and equipment to do it right. The swap
involves a number of processes which, without experience in fabrication or
welding, may be out of range for the general enthusiast. Nonetheless, a
competent suspension shop would be able perform this kind of swap if you prefer.
- Lower ride height - in comparison to the stock height of a 1/2 ton
Sweptline, Doug Shepherd believes that the truck will ride about two inches
lower. This is not much of a compromise for most, but depending on the kind of
driving you do you may not want to loose any of the ground clearance you already
have. Of course, further frame modifications which are not listed on this page
would yield the stock ride height if you feel strongly about the swap.
SWAP SPECIFICS
To begin, you will certainly want to have a level floor surface to work with.
This way, all of your measurements for the two frames will have an accurate
surface to work from. You can even use the floor as a reference by marking it
with centerlines or other measurements. A level floor will allow you to position
the frames properly so you can secure them for welding. Below is a basic list
of recommended tools for the swap process (this is by all means a partial
list):
| Recommended Frame Swap Tools |
|---|
| Permanent marker | Measuring Tape |
| Ruler | String |
| Welder (MIG) | Cut-off saw (pneumatic) |
| Socket wrench set | Drill w/bits |
| Jack Stands (6-8) | C-clamps and/or
Quick-Grip bar
clamps |
| Engine Hoist | Engine Stand (Optional) |
| Torch | |
Be sure to take measurements of frame height from ground in the natural
riding position of the truck before you start to dismantle. Then, take apart
the front end of the Sweptline Era (`61-`71) truck, remove the motor and tranny,
and take everything down to the bare frame stage. You will most likely want to
remove all of the firewall components such as brake/clutch master cylinders
fluid lines, and the fuel lines so that they are not a hazard when welding is
underway.
Anchor the truck on jack stands at the natural height of the vehicle. If you
choose to set this up so that the truck does not sit at its natural height, no
problem, just measure where the wheels would be off of the ground. Either way
will work, but choose the method that will work best for your situation. The
engine is a consideration here, as when it is out it will cause the front of
the truck to sit higher than normal. Its probably best to take measurements
of frame height from ground in the natural position before you start to
dismantle.
MEASURE TWICE, CUT ONCE
Next, take measurements of all pertinent aspects of both frames. This
includes the track width, frame/truck centerline, axle centerline, location of
crossmembers, engine mount positions, and anything else that will have an effect
on the swap process. Write these figures down and keep them accessible for
reference during the swap. If you are using the floor as a reference for certain
measurements, mark the floor with the engine mount position, axle centerline,
truck centerline, and anything else that may dictate the position of the new
frame stub. Mark the truck centerline onto the firewall as well. You may also
choose to trace out portions of the `61-`71 frame onto the floor so that you can
see exactly how things are shaping up relative to the original frame. Once its
gone, its gone!
FRAME SPECIFICS
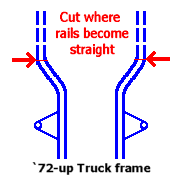
`72-`93 FRAME PREP
The `72-`93 frame will be cut where the framerails make the wide turn and become
straight again as they go toward the back of the vehicle. (See image below) You
want to keep the portion of each framerail that angles out, but the bend to
straight is the where you want to make the cut.
 `61-`71 FRAME PREP
Once everything has been removed, measured, recorded and marked, one can begin
the removal of the primative frame stub. This involves cutting the Sweptline
truck's frame approximately 8"-12" forward of the firewall. Then, notches are
cut into each framerail at 8"-10" back from the primary cut that was made.
Manual transmission trucks may have some trouble with this swap, due to the
location of the bellhousing crossmember that is located in this region of the
frame. If your truck has a standard transmission, you may have to remove this
crossmember and have a custom unit fabricated. It is tough to say, as Doug
performed the swap on a `68-`71 truck which had a slightly different
crossmember setup than `61-`67 trucks do. If you're planning on swapping
transmissions from a standard to an auto, you may need to get your hands on
an automatic tranny crossmember which will allow you to mount the tranny in
its stock location. See also the tranny section further
down on this page.
`61-`71 FRAME PREP
Once everything has been removed, measured, recorded and marked, one can begin
the removal of the primative frame stub. This involves cutting the Sweptline
truck's frame approximately 8"-12" forward of the firewall. Then, notches are
cut into each framerail at 8"-10" back from the primary cut that was made.
Manual transmission trucks may have some trouble with this swap, due to the
location of the bellhousing crossmember that is located in this region of the
frame. If your truck has a standard transmission, you may have to remove this
crossmember and have a custom unit fabricated. It is tough to say, as Doug
performed the swap on a `68-`71 truck which had a slightly different
crossmember setup than `61-`67 trucks do. If you're planning on swapping
transmissions from a standard to an auto, you may need to get your hands on
an automatic tranny crossmember which will allow you to mount the tranny in
its stock location. See also the tranny section further
down on this page.
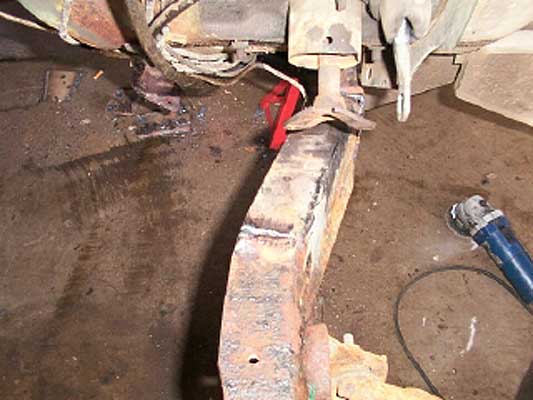
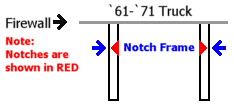 These notches (shown in red) will allow you to bend
the early truck frame at an angle inward that will match the angle of the
`72-`93 frame stub you are adding. Consult your measurements or make more
regarding the later truck frame and the angle that is needed. Use a torch to
heat one side of the frame around the area where the bend will be made, then
bend the frame to the angle matching the later frame stub. A jig or mock-up may
be useful during this portion of the process. Muffler shops use welding rod to
get the general shape they want before bending their tubing. You can use the
same process here, but you may want to consider using a larger material such as
angle iron to simulate the proper angle.
These notches (shown in red) will allow you to bend
the early truck frame at an angle inward that will match the angle of the
`72-`93 frame stub you are adding. Consult your measurements or make more
regarding the later truck frame and the angle that is needed. Use a torch to
heat one side of the frame around the area where the bend will be made, then
bend the frame to the angle matching the later frame stub. A jig or mock-up may
be useful during this portion of the process. Muffler shops use welding rod to
get the general shape they want before bending their tubing. You can use the
same process here, but you may want to consider using a larger material such as
angle iron to simulate the proper angle.
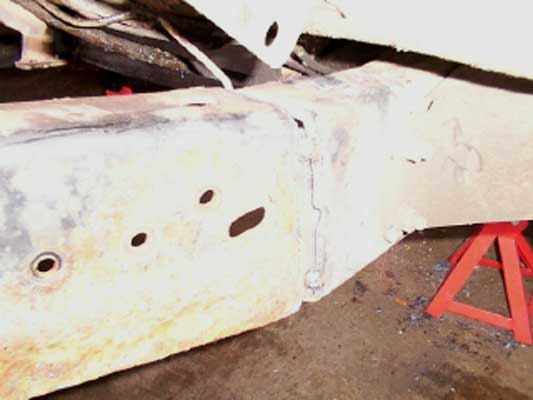
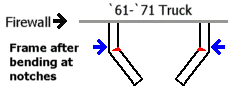 As you can see in the above image, the frame stubs have been bent inward so they
can accept the matching angle of the more modern frame. Weld up the notches
once you are certain that the angle is correct. It is suggested that you also
use plates on top of the welded notches to further strengthen the modified area.
Doug recommends plates that are 1.5" wide and 8" long.
As you can see in the above image, the frame stubs have been bent inward so they
can accept the matching angle of the more modern frame. Weld up the notches
once you are certain that the angle is correct. It is suggested that you also
use plates on top of the welded notches to further strengthen the modified area.
Doug recommends plates that are 1.5" wide and 8" long.
MERGING THE TWO FRAMES
At this point, you should be ready to mate the modern truck frame to the
modified Sweptline truck frame. Move the `72-`93 truck frame stub over the bent
portions of the older truck's modified frame. Measurement is crucial here,
where the wheelbase and tracking of the vehicle is in your hands. You will
certainly want to measure the front wheels relative to the rear wheels and check
the centerlines for the wheels (both longitudinal and transversal). Once you
have checked these measurements don't forget to check the side to side widths,
the diagonal squareness of the two frames, and the height from ground.
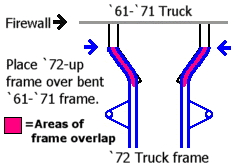 The image above shows both frames, with the overlap highlighted in magenta. As you can see, the matching
angle of both frames after being modified provides an excellent mating surface
for welding and strength. Once you are sure that all measurements match up and
everything has been double checked, tack weld the two frames at a couple of
points. Then, recheck all of your measurements. Once the measurements have all
been verified, you will want to drill the two frames (somewhere along where they
mate) to accept 1/2" grade 8 flange-headed bolts. Two per side are enough to
hold everything together for welding. Again, re-check your measurements as you
perform these operations, you'll be glad you did.
The image above shows both frames, with the overlap highlighted in magenta. As you can see, the matching
angle of both frames after being modified provides an excellent mating surface
for welding and strength. Once you are sure that all measurements match up and
everything has been double checked, tack weld the two frames at a couple of
points. Then, recheck all of your measurements. Once the measurements have all
been verified, you will want to drill the two frames (somewhere along where they
mate) to accept 1/2" grade 8 flange-headed bolts. Two per side are enough to
hold everything together for welding. Again, re-check your measurements as you
perform these operations, you'll be glad you did.
Once you have the bolts tight and the measurements are correct, you can proceed
with finish welding to achieve a solid frame.
WHAT ABOUT THE REST?
Mating the two frames was the bulky part of the job. Now you have to deal with
mounting the front sheetmetal and bumper, adapting the steering column to box
rod and U-joints, preparing the brakes and fluid lines, as well as the engine
and tranny stuff.
ENGINE AND TRANSMISSION MOUNTING
If you have a automatic transmission truck, you should have no problem by using
the same brackets and crossmembers to mount the Sweptline engine back into its
new home. The alignment should match up well, but your measurements of both
trucks will have to verify this. If you are planning to go with a change of
transmission or have a standard tranny, your job gets a little tougher.
STANDARD TRANSMISSION TRUCKS
These trucks have a crossmember that the bellhousing rests on and bolts to which
is towards the front of the truck near the firewall. The standard tranny
(usually the NP-435 or NP-420) then bolts to the beefy bellhousing which
provides enough strength for the whole assembly. This crossmember can most
likely stay in the frame even though it is very near the area that the more
modern frame stub attaches to.
TRANNY AND ENGINE SWAPS ALONG WITH THE FRAME SWAP
There are a great deal of possibilities that would pertain to this portion of
the job; however, there is simply no way to address all possible combinations
of engine and tranny that could be had in these trucks. Basically, if you're
keeping the tranny, then don't worry about the crossmembers. If you're changing
tranny, you'll need the crossmember that corresponds to the tranny you want to
install unless it isn't a Chrysler tranny. For engines - slant six, small
block and big block engine mounts can be purchased for the `72-`93 frame along
with the rubber isolators. When in doubt, try to mimic the factory
configuration as best as possible.
STEERING
The tough part of adapting this frame, besides welding it into place properly,
is probably the change of steering and how to adapt your column to the relocated
box. This involves adding an adapter, steering U-joints and a long steering rod
to go from the old column to the box located towards the front of the engine.
If your `72-`93 truck frame stub came with power steering, you will also need to
add a power steering pump which merely involves locating the proper brackets and
hoses for the more modern truck application. You can get the brackets from a
junkyard or order them from a reseller.
This steering rod will have trouble clearing the upper A-arm of the more modern
suspension. To get the proper clearance simply grind away a small portion of
the A-arm that is the obstruction, just enough to get the extra room you need.
Removing too much will jeopardize the strength of the A-arm.
Some may choose to change the column while performing this swap. The column
from the `72-`93 truck can be added to the Sweptline, or you can purchase a
custom column from one of the many aftermarket companies that offer them.
Contact Borgeson Universal Company for all your needs in steering U-joints,
intermediate steering shafts, slip joints, and other related items.
Information:
Borgeson Universal Company, Inc.
187 Commercial Blvd.
Torrington, CT 06790-3098
(860)-482-8293
Fax: (860)-496-9320
Check with Ididit Incorporated for custom steering columns. They offer tilt
columns with all the accessories to compliment your truck's interior. Columns
from Ididit are available in various lengths to properly fit a wide range of
applications. Information:
Ididit Inc.
11353 Tecumseh-Clinton Rd.
Clinton, MI 49236
(517)-456-4133
EXHAUST
Your exhaust system will definitely need to be revamped if not totally redone
after this swap is performed. Your manifolds will work, but if you have
Sweptline truck headers you'll need a set of `72-up headers from Mopar
Performance, Hedman Hedders or some other
company. Part numbers for these headers are as follows:
- Mopar Performance 318-360 `72-`91 trucks #P4529439 (1 5/8" tubes, 3"
collector)
- Hedman Hedders 318-360 `72-`93 trucks #79080 (1 5/8" tubes, 3" collector)
- Unfortunately, Mopar and Hedman do not currently make Big-Block headers
for `72-up trucks.
BODY AND BUMPER PROVISIONS
You will certainly want to bolt the core support solid to the frame once this
modern frame stub has been added to your Sweptline Era Truck. These front
panels will eventually become damaged along with the cab and possibly other
parts if not secured. I've seen trucks that haven't had their core supports
fixed solid to the frame; the result is severe cab damage (the front mounts
collapse causing the cab to sink). Simply fabricate brackets that allow the
core support bolts to fasten into the frame. You may even be able to drill into
the frame for these bolts, but you will probably need a spacer of some sort to
keep the front sheetmetal supported.
The front bumper from your Sweptline truck can be redrilled to match the newer
mounts, or you can fabricate a set of brackets to adapt the older bumper to the
frame.
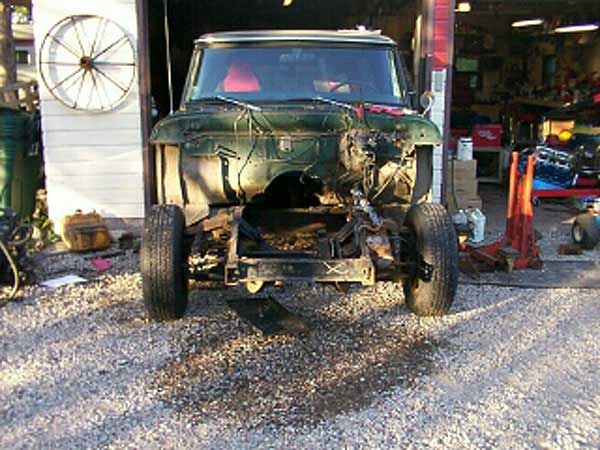
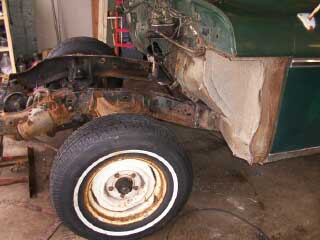
Randy's `70 D-200 Subframe Swap
Special thanks to Randy of Minnesota for providing the information and photos in the following
article.
BEFORE THE SWAP
 |
|---|
 |
|---|
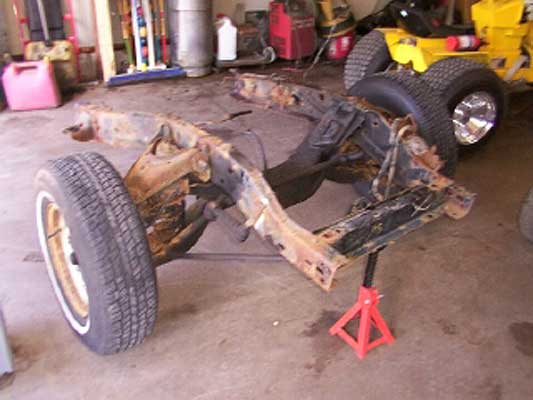
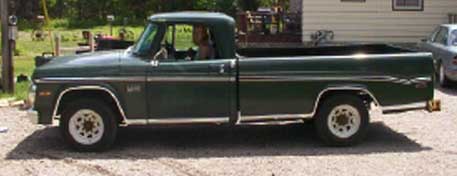
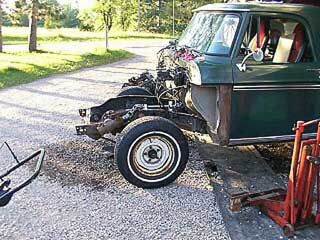
| Photos of Randy's truck, a `70 Dodge D-200 Longbed. This
truck has a 383 and will be accepting the `82 IFS subframe shown in the
following photos. |
 |
|---|
 |
|---|
| Click on either of the images above to see the
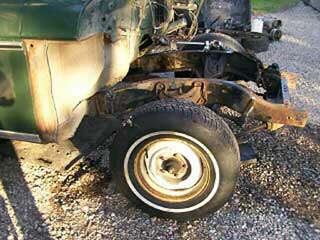
larger version.Shown here is the frame stub from the `82 1/2 ton truck. Note that
the subject truck is a 3/4 ton while the donor subframe is a half
ton. Realistically, the differences will be in the number of
wheel lugs, the size of the brakes, coil spring capacity, and the fact that
the 1/2 ton a-arms and suspension components probably aren't as beefy as the
3/4 ton units would be. |
 |
|---|
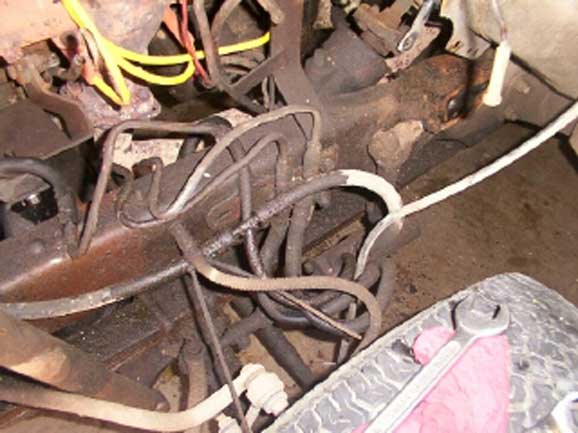
| Click on the image above to see a
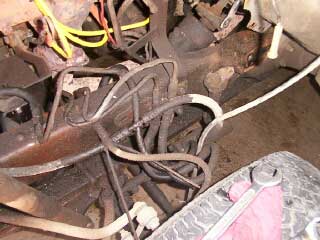
larger version.Randy included this photo of the
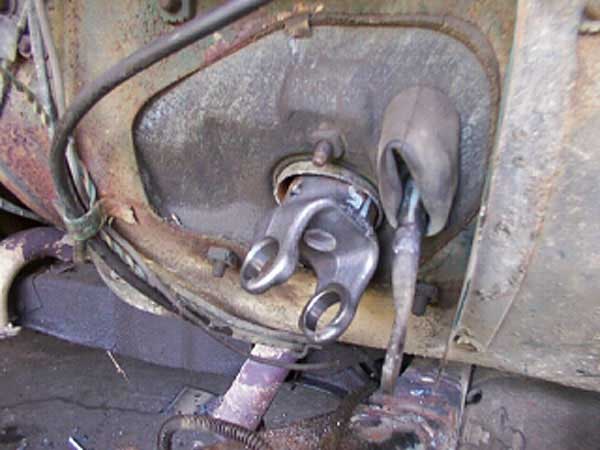
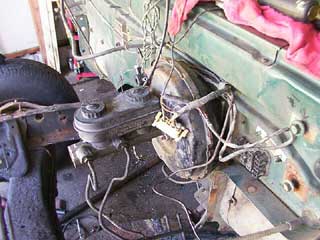
control valve and hoses for the OEM power steering setup on his previously I-beam equipped `70
D-200. He states that, "this power steering setup is rickety and I don't recomend it." Randy noted
that the system is difficult to find parts for and the hoses must be
custom fabricated, which is a pain. Randy finally disconnected the
pump after blowing a third hose, having already custom built two of
the existing hoses. |
 |
|---|
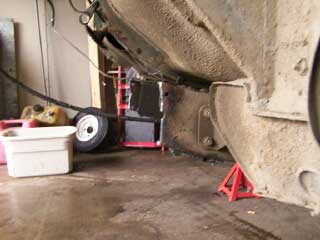
| Click on the image above to see a
larger version.Here, Randy used two jack stands under the frame at the cab and two
more (not visible in photo) at the rear of the truck to support it during the swap.
|
Randy suggests that the "trick" is to not let the truck move once it's on the jack stands (prior to
cutting off the old frame, of course). He also suggests using a square from floor to frame and make
tons of marks on the floor relating to important measurements or component locations. Along with
that, write down measurements of anything that is important to the swap. Randy took extra care to
ensure that the core support bolt hole measurements of the original frame were accurately recorded
once the truck was on jack stands. He did this to insure that the frame would be properly located to
hang all of the sheetmetal once the job was finished.
One thing to consider in a swap such as this is the squareness of the front wheels relative to the
rear wheels. Randy added that he, "also made marks on the floor towards rear of truck on each side
the same distance from the front of the truck so he could use the marks to check the squareness of the
subframe." This type of precision is CRUCIAL if you ever want the subframed truck to drive straight
down the road once you're finished. You may even want to reference the center of the rear axles to
the front spindles in taking measurements for this swap to ensure success.

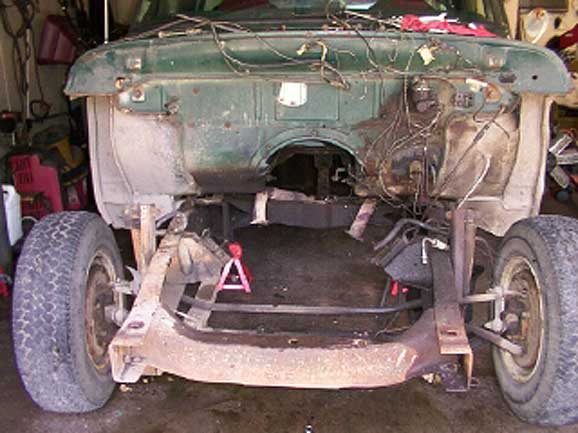
 |
|---|
| Click on the image above to see a
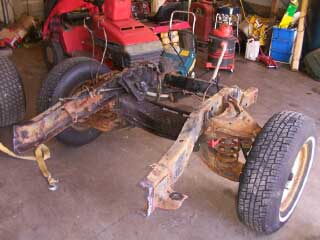
larger version. This image shows the truck
(supported with the jack stands) with the old I-beam front
suspension cut off. |
Be sure to cut the original truck's frame and the subframe off at a point where will you will have
more than enough material to make the connection between the two frames (i.e. leave a little excess,
then trim later). Randy measured from the front cab mount bracket bolts and cut the `70 truck frame
off about six inches in front of the bolts.
Here's an interesting note; Randy says that the `82 1/2 ton truck frame was only about 1/4" narrower
than the `70 truck frame underneath the cab. He mentioned that if he had this swap to do over again,
that is where he would connect the modern front subframe to the older truck frame. He suggests
removing the cab if this is where you choose to mate the two frames since it would be a major
obstruction and the cab mounts would have to be temporarily removed if the cab was not.
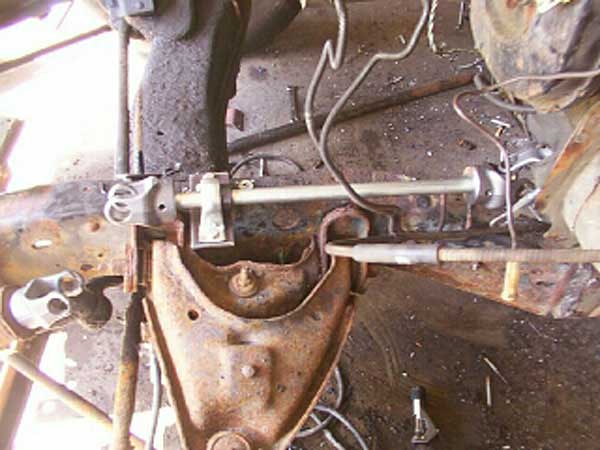
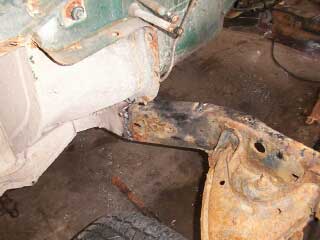
 |
|---|
| Click on the image above to see a
larger version.This image shows the two frames
welded together. The actual point where the two meet is behind the
steering shaft stub in this photo. More visible here is the point
where the subframe was notched to allow for it to be spread out to
mate with the `70 truck frame. |
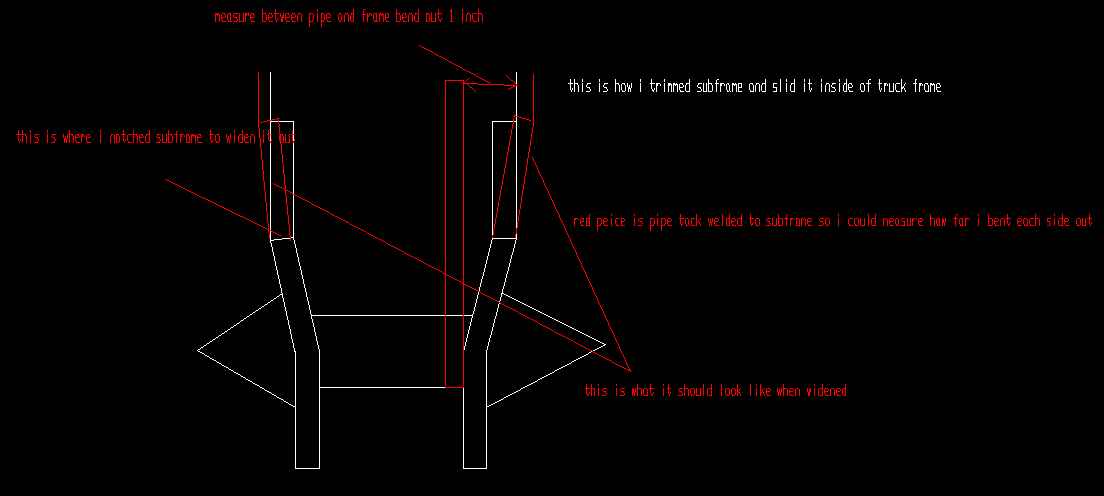
Randy states, "Here you can see the frames together. What I did was trim the flange on the
top and bottom of the subframe and left about 3 inches of it sticking out to
bolt to the truck (`70 truck frame). I had to spread the subframe to get the proper width (so that the
width at the connection point would be the same). I needed to spread each side of the subframe out
one inch. What I did was weld a pipe to the subframe by the
engine crossmember so I could tell how much I was bending each side, which I
completed using a porta power to do the bending. After I notched the subframe about four inches behind
the upper control arm brackets where they are riveted to the subframe, the pipe
was tack welded to the frame in front of where i notched it... that way I could
tell when I bent it out one inch. I did this for each side of the frame." see the drawing included
below for a better description...
 Drawing provided by Randy for this article.
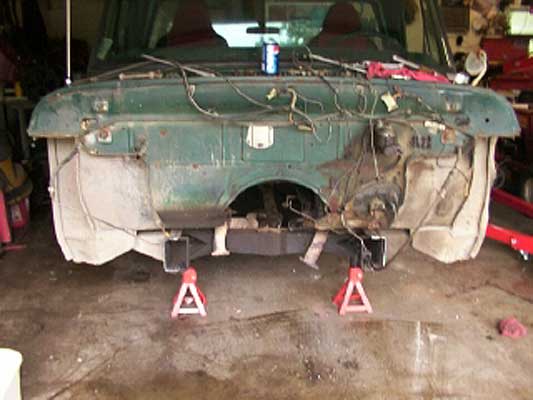
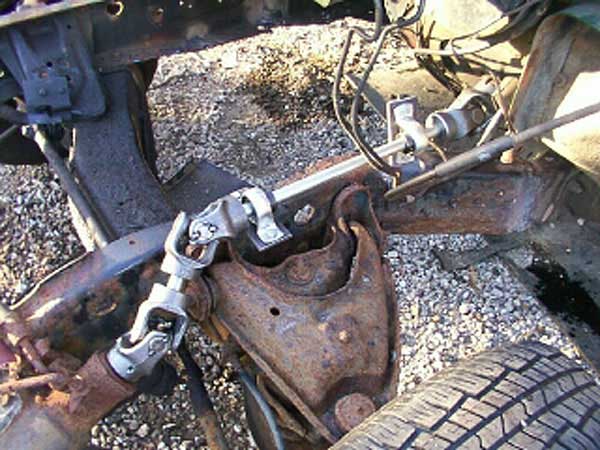
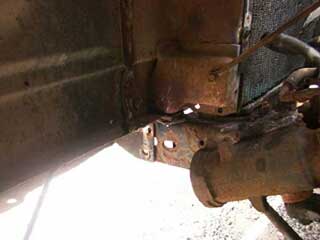
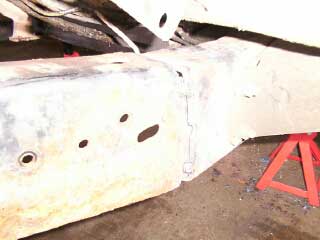 |
|---|
| Click on the image above to see a
larger version.This image shows the outside of the
original frame and subframe combo. Driver's side of truck is shown
here. |
 |
|---|
| Click on the image above to see a
larger version. Here's a profile view of the
1982 D-100 subframe as attached to the 1970 D-200 Truck Frame from the driver's
side. |
|
|---|
| Click on the image above to see a
larger version.
In this photo, you can better see the
region where the two frame sections were trimmed and then welded.
Randy plans to box the frame from the rear of the front cab mount to
about six inches in front of where the subframe was notched. |
|
|---|
| Click on the image above to see a
larger version.
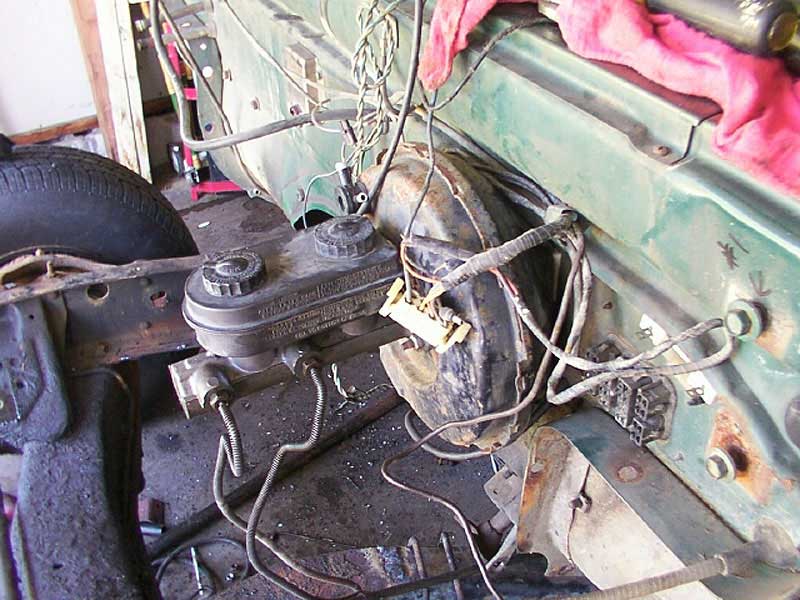
From Randy's e-mail with these photos:
"Here you can see the power brake master cylinder and booster unit
installed. They are directly out of the donor `82. When I took off the
two bolt non-power master cylinder, I thought I was going to have to
drill holes in the firewall to mount the power brake unit. Conversely,
the holes were already there, I just had to punch them out. There's about
four different sets of holes in the firewall. The holes work like conduit
type outlet boxes--they are stamped into the sheetmetal but not punched
out. You just have to knock out the partially punched holes. I put
the power brake master unit in because the disc brakes require a
different proportioning valve to work right. Also, the master has a
larger bore to work the bigger pistons in the discs (that seems to make
sense)."
|

|

|
|---|
| Click on the image above
to see a larger version. | |
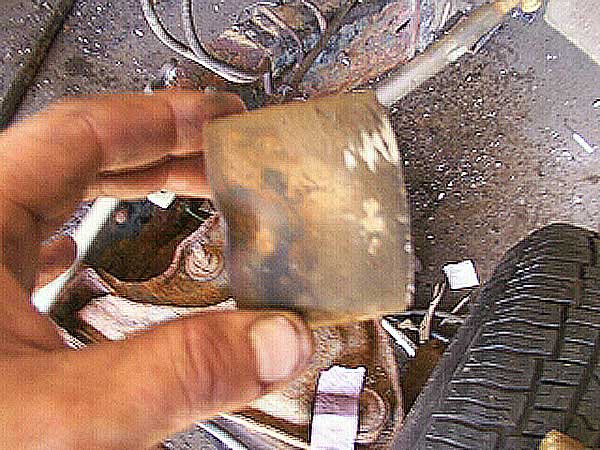
Randy states, " I cut the steering tube off at the bottom (firewall
exit location) of the original `70 truck column to make the first u- joint
higher in the truck about 2 1/2 to 3 inches. (That's what the pic of me
holding the peice of tube is; that's what I cut off.) The steering
works smooth as silk and the joints are greaseable to boot--they should
be around long after the truck is gone."
Randy also mentioned, "I went to the good `ole fleet farm and aquired
some pto shaft universal joints. Got all of it and the shaft (which is
just 3/4 inch diameter solid round stock) for about $45. The joints
are really big for what I'm using them for, but I don't want my steering
to come apart when I'm cruising. I had the tilt column from the donor
truck, but we all know that Mopars have a terrible wiring system to
begin with. As a result, I didn't want to be butchering the `70 harness
to wire in the `82 tilt column. Also, I would have ended up with
two ignition switches (one on the dash and one on the column). That
would have been undesirable even if I had plugged the hole in dash.
|
| 
|
|---|
| Click on the image above
to see a
larger version.
|
| I used three joints for the steering shaft to
clear the upper control arm
because it looked really close to it and would have required alot of
grinding to make enuff room. I had to use pillow block bearings to
support the long shaft or it would have flopped around."
|
|

|
|---|
| Click on the image above
to see a
larger version.
|
| These photos show a close up view of the steering
shaft completed. Randy noted, "Here's the front of the coulmn. The tack
welds are pretty obvious here. It looks complicated, but with three
u-joints, I don't have any control arm clearance problems."
|
| 
|
|---|
| Click on the image above
to see a larger version. |
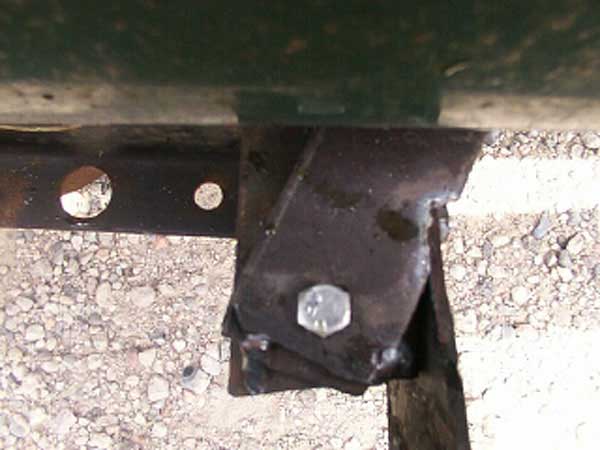
|
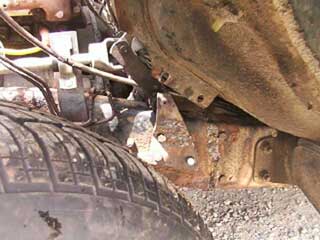
Randy mentioned, "This is a photo of the front core support mounts where
you see the bolt. The bolt in the photo is located where the `82 core
support bolted on. I had to make a bracket because the older truck core
support sat back about 4 inches, so I just bolted the strap in, then
welded it on." |
| 
| 
|
|---|
|
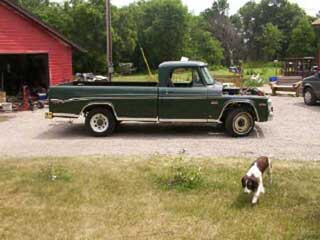
Click on the image above to see a larger version.
|
From Randy, "Here's the truck rolled out of garage. It sits about 2 1/2
inches lower now. I welded the frame with the good `ole Lincoln
Stick Welder, since my wire feed isn't hot enuff for that thick
truck frame steel. I used 6013 1/8 inch rods and it welded up
really strong.
Doesn't appear to have any flex at all, so I'm not
sure I'm going to box in the welded section of the frame. I might just
use 2' by 1/4' flat bar stock to weld over the top and bottom flange
right now. With a little grinding, you wouldn't even be able to tell it
was welded (it fit that close, and boxing it would be a problem with
proportioning valve body for brakes--it is bolted inside the
driver's side framerail and would have to be moved for future service
if needed). With the flat stock, I will just tack it to frame at one end
or the other on top of the rail and heat and bend it to match the contour
of that section, then stitch weld it every couple of inches. That should
prove to be strong enough to add the strength back to rails. You cant
make it too solid, because it does need to flex a little or it will crack
and break (not good at all).
|
|
|---|
| Click on the image above to see a
larger version.
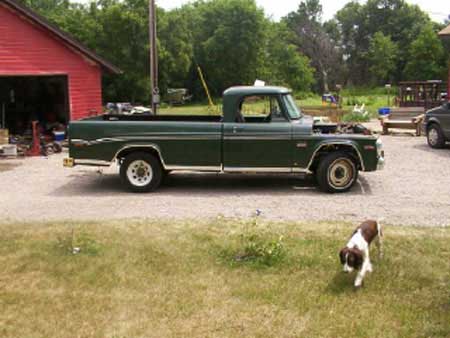
Quoting Randy again, "Here's the finished truck minus hood. It sits 3
1/2 inches lower. Frame feels rock solid. I (Randy) drove it and it
handles like a dream. The power steering is great; it turns like it was
meant to. I (Randy) can now let go of the wheel and it goes straight
(even with a worn center link in the front end). It no longer changes
lanes when I hit a bump although it leans a little more on corners than
it did before (needs swaybar)."
Randy had to change front rotors to get the 5 on 4.5 inch
bolt pattern for the wheels that the older half tons had.
Dodge changed the bolt pattern in `81 or `82 to 5 on 5.5 inch, but the
hubs and rotors are apparently interchangeable with the older ones (even
the bearings are the same according to Randy).
|
Last
updated Thursday, January 16th,
2003.
Please Note: This page is intended as a guide for the project outlined,
and is not guaranteed in any way. The information was supplied at the request
of the author and is merely an extension of what was received. All the info is
to the best knowledge of the author. Comments? Send in an Online Response.
| Engines | Rust |
Common Problems | Interiors | Drivetrain
|
| Main Page | Online Response | Part Sources |
Sweptline.org Forums
|