
This first article titled Timing is Everything was taken from HOT ROD Magazine's Brutally Basic Tech section of the April 1997 issue.
Ignition timing is typically split into three types. The first is ignition timing that is, the amount of spark lead that is set using a timing light (aimed at the harmonic balancer with the engine at idle). The second type is mechanical advance, determined by the distributor's mechanical advance system. The final type is vacuum advance, determined by the vacuum canister attached to the distributor. All three combine to produce the total amount of ignition timing in your engine at any given load and/or rpm.
Since a mechanical distributor is still the most popular form of ignition, we'll focus on it. But before we set these values, it's important to understand how these events interact. Initial advance is set by moving the distributor in the engine. Once initial timing is set, it's complemented by the mechanical and vacuum advance curves.
Mechanical advance adds additional timing to the engine and is based strictly on rpm. The mechanical advance weights and springs inside the distributor combine to produce a curve that begins with initial timing (with the engine at idle) and increases to a certain rpm, but generally peaks below 3,000 rpm. This is often referred to as the mechanical ignition curve.
 Vacuum advance also adds timing to the engine, hut it is based on engine load
and is controlled by intake manifold vacuum. When the throttle is partially
open (highway cruising), manifold vacuum is high. This vacuum signal is routed
to the distributor and "pulls" on the vacuum advance canister to create more
ignition timing. As the throttle opening increases, load increases and
manifold vacuum decreases. At wide open throttle (WOT), manifold vacuum is at
or near zero and the vacuum advance produces no additional ignition timing.
Vacuum advance also adds timing to the engine, hut it is based on engine load
and is controlled by intake manifold vacuum. When the throttle is partially
open (highway cruising), manifold vacuum is high. This vacuum signal is routed
to the distributor and "pulls" on the vacuum advance canister to create more
ignition timing. As the throttle opening increases, load increases and
manifold vacuum decreases. At wide open throttle (WOT), manifold vacuum is at
or near zero and the vacuum advance produces no additional ignition timing.
 Now that we know how these three systems work, let's look at a real-world
example. Our fictitious engine is a small-block V-8, any V-8, but these
variables interact the same with all engines. Let's give the motor 8 degrees
of initial timing, as observed with a timing light. A test on the distributor
machine reveals 28 crankshaft degrees of total mechanical advance (at 2,800
rpm) and another 14 degrees of vacuum advance. By adding all three values, we
can see that at 2,800 rpm at light throttle (14 inches or more of manifold
vacuum), the engine has 50 degrees of total ignition advance. At WOT at 2,800
rpm, however, the engine only has 36 degrees of total timing (50 degrees minus
14 of vacuum advance).
Now that we know how these three systems work, let's look at a real-world
example. Our fictitious engine is a small-block V-8, any V-8, but these
variables interact the same with all engines. Let's give the motor 8 degrees
of initial timing, as observed with a timing light. A test on the distributor
machine reveals 28 crankshaft degrees of total mechanical advance (at 2,800
rpm) and another 14 degrees of vacuum advance. By adding all three values, we
can see that at 2,800 rpm at light throttle (14 inches or more of manifold
vacuum), the engine has 50 degrees of total ignition advance. At WOT at 2,800
rpm, however, the engine only has 36 degrees of total timing (50 degrees minus
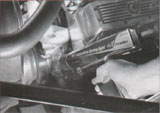
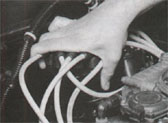
14 of vacuum advance).The photos illustrate how to go about moving the distributor and setting the initial timing. By applying a timing tape to the harmonic balancer, for example, you can set initial timing with a standard timing light and check total timing as well. To check only initial plus mechanical advance, disconnect the vacuum advance.
Total timing requirements are dependent upon many variables. A typical street engine with a compression ratio of 9.0:1 runs very well with around 36 degrees of timing (initial plus mechanical) for a rough total of 15-55 degrees of timing at light throttle when vacuum advance is employed. If the engine detonates or pings under WOT reduce the timing. If it surges or pings at part throttle, reduce the amount of vacuum advance. Experimentation with timing can help performance, driveability, and mileage by customizing the ignition curve to your particular application. Don't be afraid to make changes. HR
Idling By is another article taken from the April 1997 issue of HOT ROD Magazine's Brutally Basic Tech section.
All engines require an acceptable air/fuel ratio to run properly, even at idle. Stock or mildly tweaked engines generally idle at 16-18 inches of intake manifold vacuum between 750 and 900 rpm. Carburetors equipped with adjustable mixture screws allow the tuner to change the amount of fuel delivered to the engine creating an ideal idle mixture.
On most carburetors, turning the idle mixture screw clockwise leans the idle mixture. Turning the screws counter-clockwise richens the mixture, If there is a vacuum leak, it must be repaired before the idle mixture can be properly adjusted.
All stock engines specify a certain idle speed, but generally 800-850 rpm works well. Properly setting the idle mixture also creates the highest manifold vacuum, so a vacuum gauge makes the task easier. The best backyard procedure for setting idle mixture is the "idle speed drop" method. First, connect the vacuum gauge to the manifold. Adjust the idle mixture richer or leaner until the highest vacuum is read, once this is attained, turn the idle mixture screws leaner until the rpm begins to drop. then turn the screws richer a slight amount. The ideal idle mixture has now been set.
If you don't have a vacuum gauge, use a low-speed tachometer. The tach should have a low-scale readout that is sensitive to increments of at least 50 rpm. Use the tach to help you adjust the idle mixture screws evenly to create the highest idle speed. If the idle speed exceeds 900-950 rpm, use the idle speed screw to slow the engine down. then readjust the idle mixture.
This isn�t a difficult procedure but it can be tough if the engine has a big cam and low manifold vacuum. If the carburetor requires a large throttle blade opening, modifications will be necessary (see "Curing Holley Hiccups. HOT ROD, December '96). Otherwise, this is a simple procedure that anyone can do in a matter of minutes. HR
BASIC STARTUP AND ADJUSTMENT:
Note: The procedures outlined below are for tuning of the MP Ignition
Conversion Kit on all vehicles and all ignition conversions.
TOOLS REQUIRED: Distributor wrench, timing light, 3/32" allen
wrench.

IGNITION TUNING FOR MAXIMUM PERFORMANCE: Tuning for maximum performance assumes the rest of the engine is also suitable for maximum performance. The octane rating of the fuel being usedmust be sufficient to accomidate the engine's compression ratio. The engine's harmonic balancer must have either degree marks or timing tape which correctly shows up to 60 degrees before top dead center. The carburetor must be properly jetted so that detonation or surging is not caused by the fuel mixture being too lean when the ignition is at maximum advance. The ignition coil and spark plug wires must be able to deliver sufficient spark to fire the plugs under maximum engine loading. If you are unsure about any of the above, consult the Mopar Performance Engine Modifications Manual. The manual outlines the proper ways to construct a race engine.
If the procedures outlined for maximum performance are followed and the engine begins to detonate, you must decrease the timing advances until the detonation is eliminated. Detonation not only severely reduces power, it also destroys pistons, rings and rod bearings. Do not run an engine that is detonating.
Tools required: Timing light, 3/32 allen wrench, vaccum gauge with long hose, vaccum source ("Mighty Vac"), and a friend or helper.
1. Set the basic timing for total mechanical spark advance.
| Engine | Heads | Timing Specification |
|---|---|---|
| A | Production - Pre '89 (Iron) | 35 BTDC |
| A | Production - '89 & Newer (Iron) | 32 BTDC |
| A | W2 (Iron) | 35 BTDC |
| A | W5 (Alum.) | 35 BTDC |
| B/RB | Production (Iron) | 38 BTDC |
| B/RB | Stage I, II, III, IV, V (Iron or Alum) | 38 BTDC |
| B/RB | Indy (Alum) | 35 BTDC |
| B/RB | B1 (Alum) Under 475 cu. in. | 37-39 BTDC |
| B/RB | B1 (Alum) Over 475 cu. in., Under 15.0:1 Ratio | 36-38 BTDC |
| B/RB | B1 (Alum) Over 475 cu. in., Over 15.0:1 Ratio | 34-36 BTDC |
| B/RB | B1 TS | 34 BTDC |
| Hemi | All (Iron or Alum) | 35 BTDC |
2. Set the vaccum advance for total ignition advance.
| Engine | Total Advance |
|---|---|
| A | 50 BTDC |
| B/RB | 56 BTDC |
| Hemi | 53 BTDC |
Please Note: This page is intended as a guide for the project outlined, and is not guaranteed in any way. All info above is to the best knowledge of the author. Comments? Send in an Online Response.